SpringCould-config
配置(config)中心
作用多服务统一配置管理,主要分配置中心服务端,和配置中心客户端(主要存储配置)
Config Server
新建一个springboot项目,取名
configserver,勾选- Could discovery-> eureka server 注释掉了,引用了不注册报错,如果要用,就注册就行,这里是测试config所以先不注册
- Could config->config server
在
application启动类添加@EnableConfigServer新建一个git配置文件仓库,这里就在当前工程创建,因为这个反正都要上传git,在项目目录新建一个
config目录,然后在目录里新建一个配置仓库testrepo,再在仓库添加配置文件config-client-dev.properties内容如下1
2config-client.testsmsg = hello config me
test = haa然后git commit push推送到远程分支
在配置文件
application.yml添加如下内容1
2
3
4
5
6
7
8
9
10
11
12
13
14server:
port: 8096
spring:
application:
name: config-server
cloud:
config:
label: master #配置仓库分支
server:
git:
uri: https://github.com/xuanfong1/SpringCould/ #配置仓库git地址
search-paths: config/testrepo #配置仓库路径
username: #访问git仓库的用户名,这里因为是开放项目所以不需要设置
password: #访问git仓库的密码访问http://127.0.0.1:8096/config-client/dev/master这个地址读取配置文件
下面介绍http请求地址与资源文件映射问题
Url : /{application}/{profile}[/{label}]
资源文件格式可以为
/{application}-{profile}.yml
/{label}/{application}-{profile}.yml
/{application}-{profile}.properties
/{label}/{application}-{profile}.properties
举例:master分支有配置文件
config-client-dev.properties访问的url为ip:port/config-client/dev/master
config client
新建一个springboot项目,取名
configserver,勾选- web->web
- Could config->config client
修改配置文件
application.properties一定要修改为**bootstrap.yml**并添加如下内容1
2
3
4
5
6
7
8
9
10server:
port: 8097
spring:
application:
name: config-client
cloud:
config:
label: master #指明远程仓库的分支
profile: dev #dev(开放)、test(测试)、pro(正式)
uri: http://127.0.0.1:8096/ #配置中心地址添加一个api接口
1
2
3
4
5
6
7
8
9
10@RestController
public class HiController {
@Value("${test}") //调用配置中心的配置
String test;
@RequestMapping(value = "/hi")
public String hi(){
return test;
}
}
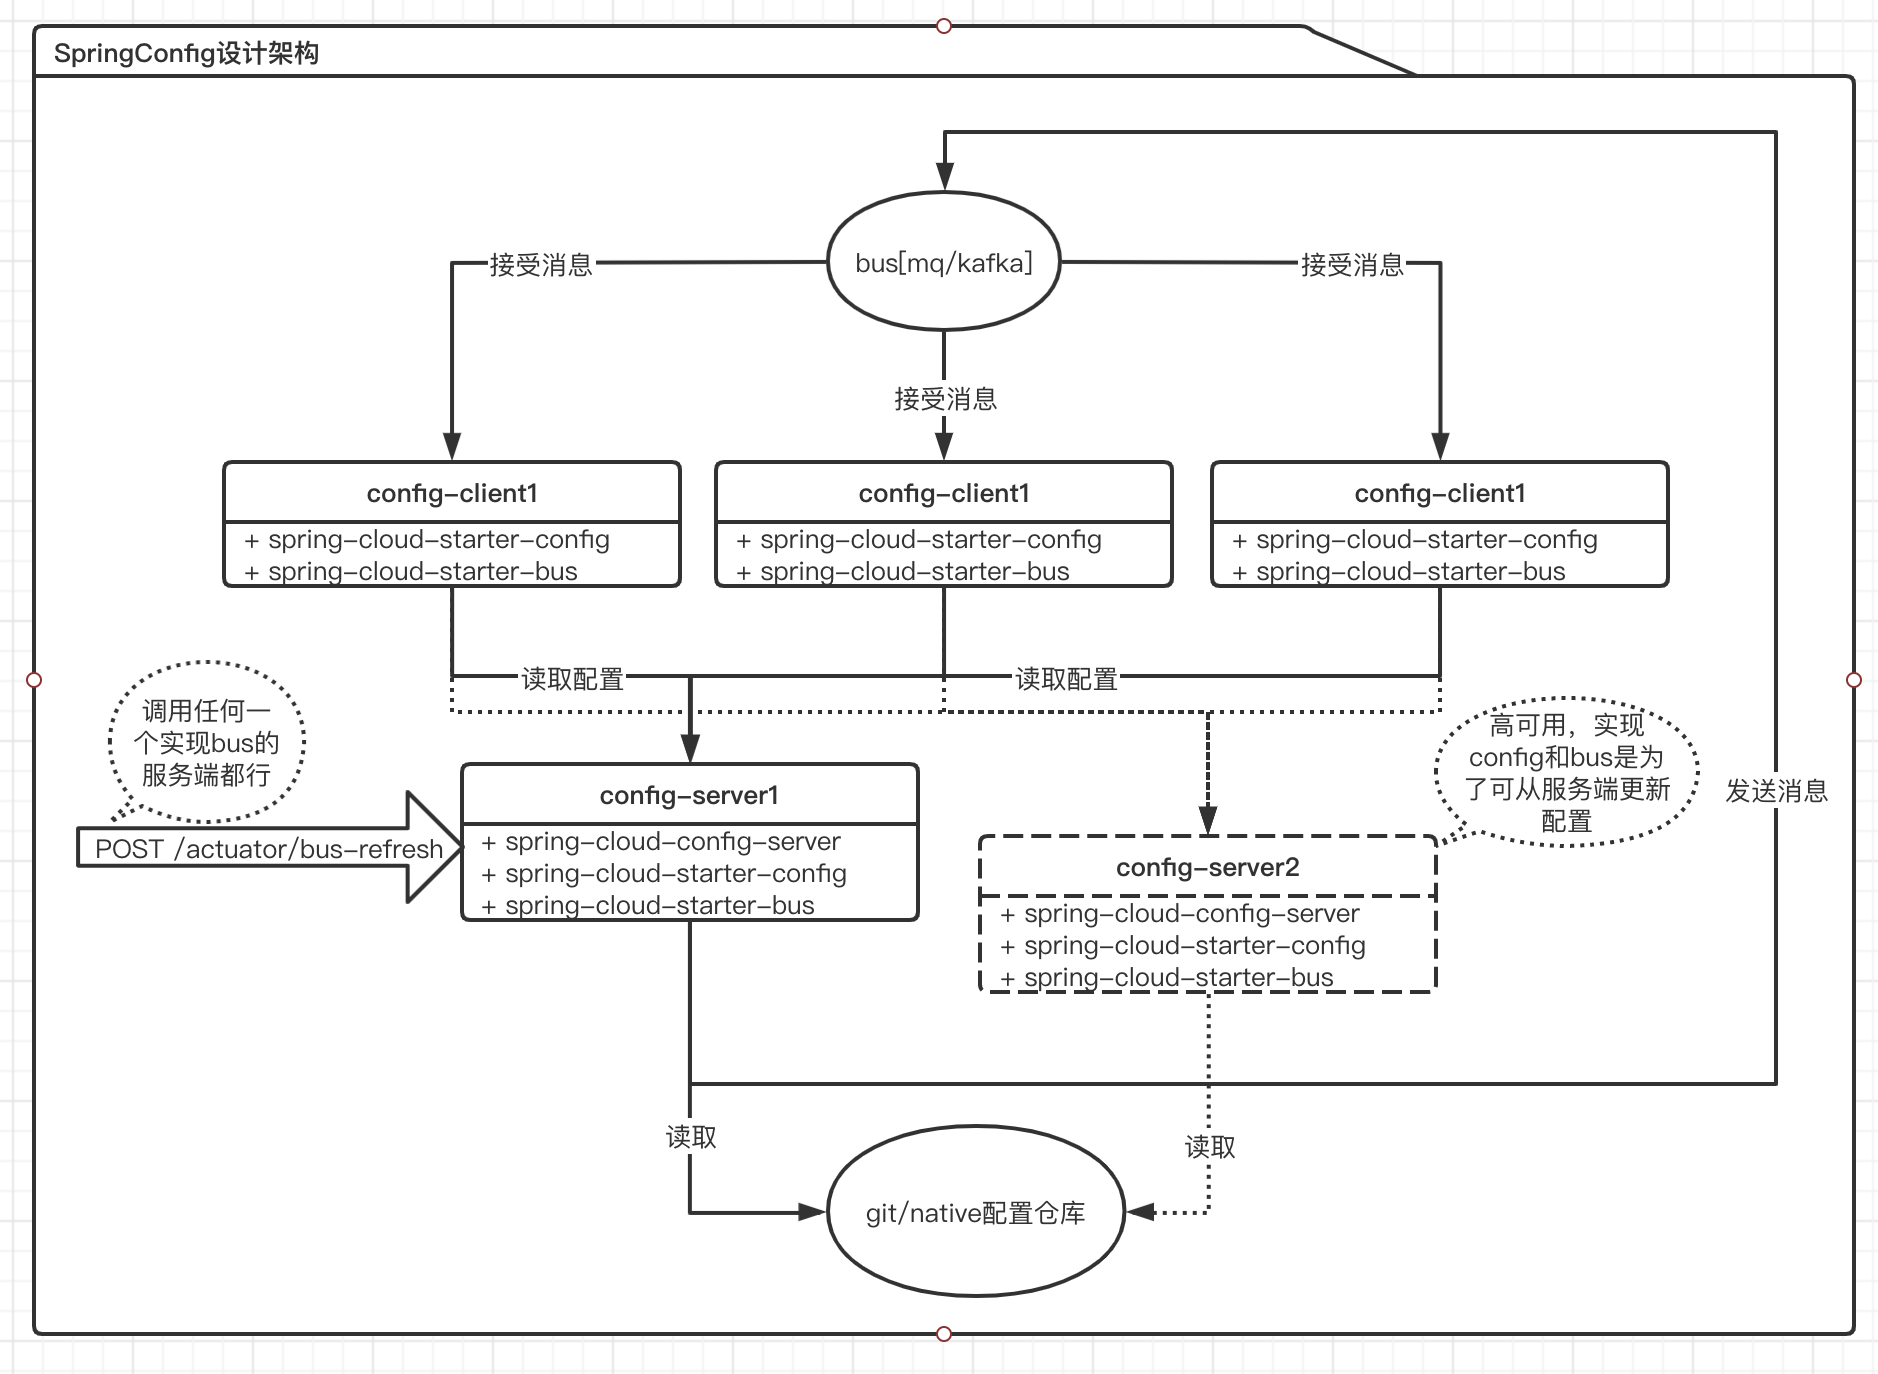
配置中心高可用
config server
添加依赖
compile('org.springframework.cloud:spring-cloud-starter-netflix-eureka-server')在
Application启动类添加注解@EnableEurekaClient在
Application.yml配置文件增加1
2
3
4eureka:
client:
service-url:
defaultZone: http://127.0.0.1:8091/eureka/ #注意要加eureka,不然找不到
config client
添加依赖
compile('org.springframework.cloud:spring-cloud-starter-netflix-eureka-server')在
Application启动类添加注解@EnableEurekaClient在
bootstrap.yml配置文件修改如下1
2
3
4
5
6
7
8
9
10
11
12
13
14
15
16
17
18server:
port: 8097
spring:
application:
name: config-client
cloud:
config:
label: master #指明远程仓库的分支
profile: dev #dev(开放)、test(测试)、pro(正式)
# uri: http://127.0.0.1:8096/ #配置中心地址 ,用eureka就不是ip地址了
discovery:
enabled: true
service-id: config-server #这里用服务名
eureka:
  client:
    service-url:
defaultZone: http://127.0.0.1:8091/eureka/ #注意要加eureka,不然找不到所以多个config-server运行,通过负载均衡就可以达到高可用
测试
依次运行服务注册中心、配置中心服务、读配置中心的客户端服务
访问http://127.0.0.1:8097/hi进行测试
图示
   graph LR
A[git仓库] -->B(config server)
A[git仓库] -->B1(config server)
A[git仓库] -->B2(config server)
B --> C{负载均衡}
B1 --> C{负载均衡}
B2 --> C{负载均衡}
C --> D[service A]
C --> E[service B]
F[eureka service]
使用本地文件作为配置中心
1 | server: |
公共配置文件
1 | application.properties #公共配置文件,所有服务都会加载这个默认配置文件,适合放公共的数据库配置等 |
额外
如果要使用vm启动参数,需要在config client设置如下三个参数
1 | #使用vm启动参数,去掉下面的注释 |
疑问:vm设置-Dserver.port等参数时,又不需要上面的设置
解释:vm参数如果不设置上面的会被配置文件里面的覆盖,如果配置文件里面没有设置,那就是用的vm的了
加载顺序
举例server.port
client 里面的
resources/bootstrap.ymlvm里面
-Dserver.portconfig里面
config-client-dev.properties
三个都设置,使用3,只设置1,2使用2,只设置1,使用1
可推测优先级3>2>1
开发加载自己配置优化
利用默认分支功能,全局修改所有微服务为自己的配置
- 新建个自己的配置分支
- 复写spring config server启动参数
spring.cloud.config.server.git.default-label=my-baranch为自己的分支号 - 注意不要在spring config client指定分支
spring.cloud.config.label=master